HDFS的java api
回顾:
任务
1.掌握hdfs的java操作
2.理解namenode与datanode的工作机制
目标
1.hdfs的java操作
2.hdfs的组成部分详解
第一节:使用java操作HDFS
1.1 配置开发环境
本课程的开发环境基于windows操作系统来配置的,使用的HDFS版本是hadoop2.7.1.
下载winutils的windows版本https://github.com/SweetInk/hadoop-common-2.7.1-bin
配置环境变量
第一步
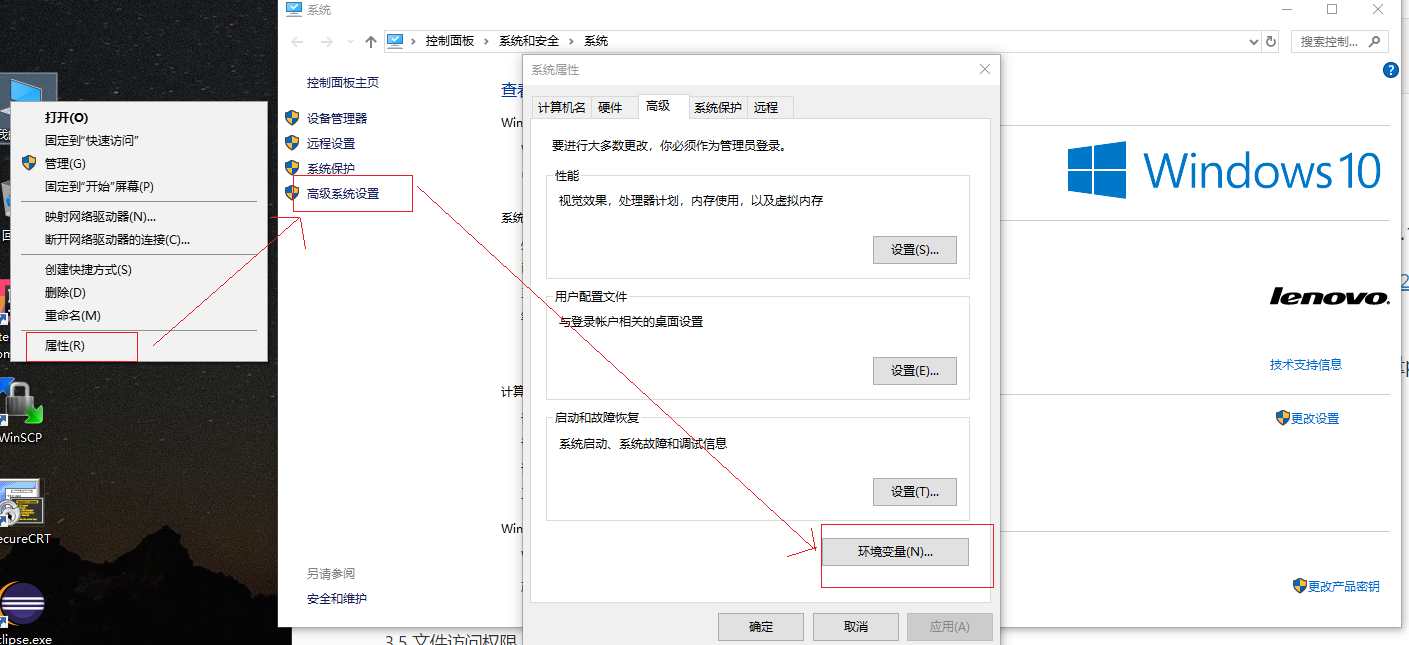
第二步
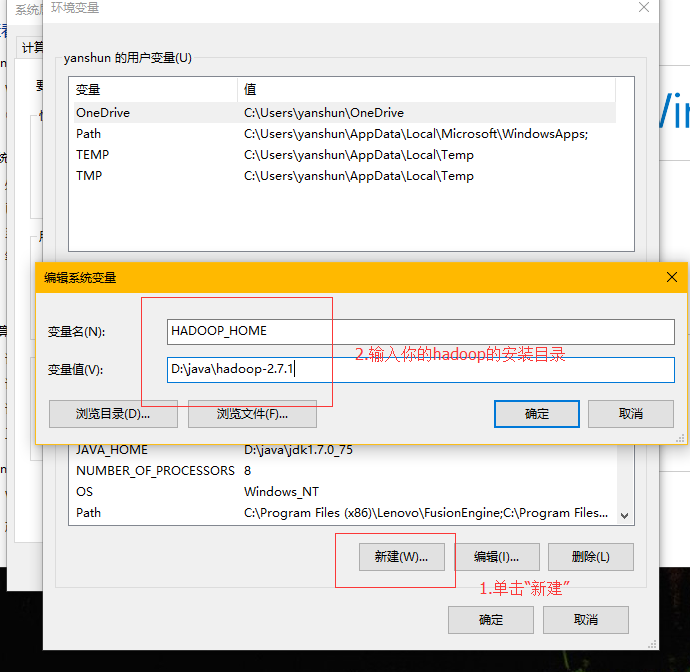
第三步
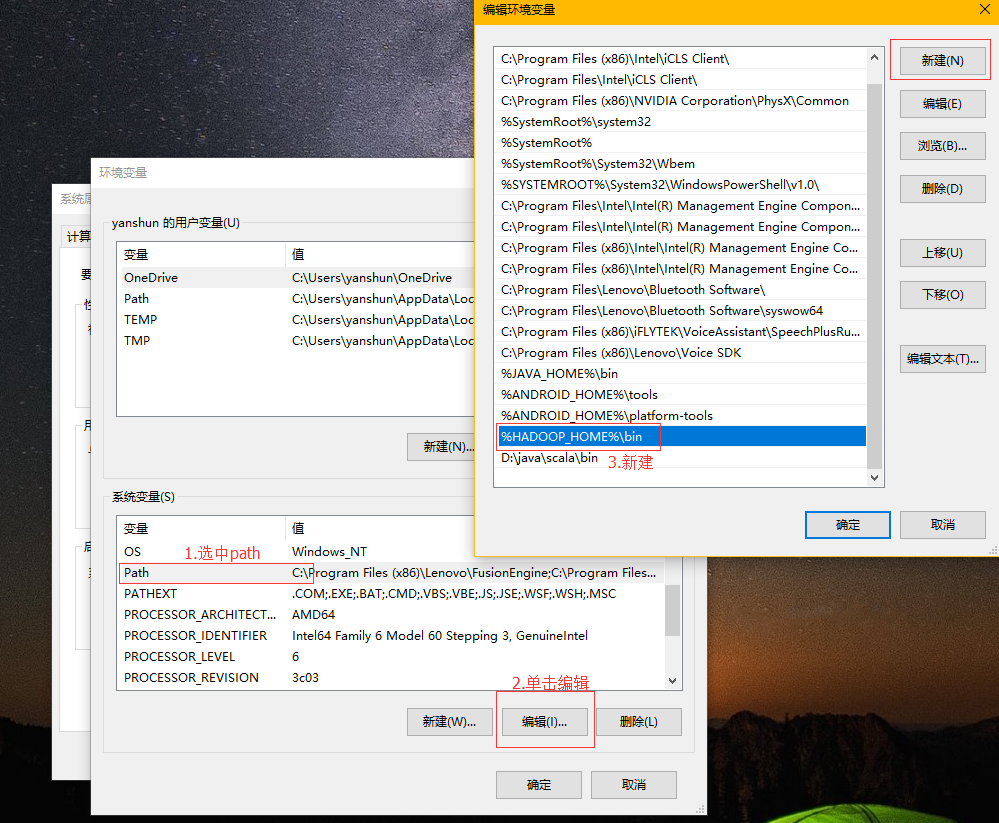
压缩包(hadoop-common-2.7.1-bin)里的hadoop.dll,并拷贝到c:\windows\system32目录中。
在eclipse环境中创建一个maven项目,并引入依赖。
xxxxxxxxxx<dependency><groupId>org.apache.hadoop</groupId><artifactId>hadoop-client</artifactId><version>2.7.1</version></dependency>
1.2 HDFS控制(Java)
hadoop中关于文件操作类基本上全部是在org.apache.hadoop.fs包中,这些api能够支持的操作包含:打开文件,读写文件,删除文件等。
FileSystem,该类是个抽象类,只能通过来类的get方法得到具体类。get方法存在几个重载版本,常用的是这个:
static FileSystem get(Configuration conf);
1.3 代码演示
ximport java.io.IOException;import org.apache.hadoop.conf.Configuration;import org.apache.hadoop.fs.FSDataInputStream;import org.apache.hadoop.fs.FSDataOutputStream;import org.apache.hadoop.fs.FileStatus;import org.apache.hadoop.fs.FileSystem;import org.apache.hadoop.fs.Path;publicclass HadoopFSOperations { public static void main(String[] args) throws Exception { // createNewHDFSFile("/tmp/create2.c", "hello"); // System.out.println(readHDFSFile("/tmp/copy.c").toString()); // mkdir("/tmp/testdir"); // deleteDir("/tmp/testdir"); listAll("/tmp/"); } /* * upload the local file to the hds notice that the path is full like * /tmp/test.c */ public static void uploadLocalFile2HDFS(String s, String d) throws IOException { Configuration config = new Configuration(); FileSystem hdfs = FileSystem.get(config); Path src = new Path(s); Path dst = new Path(d); hdfs.copyFromLocalFile(src, dst); hdfs.close(); } /* * create a new file in the hdfs. notice that the toCreateFilePath is the * full path and write the content to the hdfs file. */ public static void createNewHDFSFile(String toCreateFilePath, String content) throws IOException { Configuration config = new Configuration(); FileSystem hdfs = FileSystem.get(config); FSDataOutputStream os = hdfs.create(new Path(toCreateFilePath)); os.write(content.getBytes("UTF-8")); os.close(); hdfs.close(); } /* * delete the hdfs file notice that the dst is the full path name */ public static boolean deleteHDFSFile(String dst) throws IOException { Configuration config = new Configuration(); FileSystem hdfs = FileSystem.get(config); Path path = new Path(dst); booleanisDeleted = hdfs.delete(path); hdfs.close(); returnisDeleted; } /* * read the hdfs file content notice that the dst is the full path name */ public static byte[] readHDFSFile(String dst) throws Exception { Configuration conf = new Configuration(); FileSystem fs = FileSystem.get(conf); // check if the file exists Path path = new Path(dst); if (fs.exists(path)) { FSDataInputStream is = fs.open(path); // get the file info to create the buffer FileStatus stat = fs.getFileStatus(path); // create the buffer byte[] buffer = newbyte[Integer.parseInt(String.valueOf(stat.getLen()))]; is.readFully(0, buffer); // 多次读取 // int length = 0; // while ((length = is.read(buffer, 0, 128)) != -1) { // System.out.println(new String(buffer, 0, length)); // } is.close(); fs.close(); returnbuffer; } else { thrownew Exception("the file is not found ."); } } /* * make a new dir in the hdfs * the dir may like '/tmp/testdir' */ public static void mkdir(String dir) throws IOException { Configuration conf = new Configuration(); FileSystem fs = FileSystem.get(conf); fs.mkdirs(new Path(dir)); fs.close(); } /* * delete a dir in the hdfs * dir may like '/tmp/testdir' */ public static void deleteDir(String dir) throws IOException { Configuration conf = new Configuration(); FileSystem fs = FileSystem.get(conf); fs.delete(new Path(dir)); fs.close(); } public static void listAll(String dir) throws IOException { Configuration conf = new Configuration(); FileSystem fs = FileSystem.get(conf); FileStatus[] stats = fs.listStatus(new Path(dir)); for (inti = 0; i<stats.length; ++i) { if (stats[i].isFile()) { // regular file System.out.println(stats[i].getPath().toString()); } elseif (stats[i].isDirectory()) { // dir System.out.println(stats[i].getPath().toString()); } elseif (stats[i].isSymlink()) { // is s symlink in linux System.out.println(stats[i].getPath().toString()); } } fs.close(); }}1.4 FileSystem
我们知道,首先对于任何文件系统都是与当前环境变量紧密联系一起,对于当前 HDFS来说,在创建出当前文件系统实例之前,有必要获得当前的环境变量。代码见下:
Configuration conf = new Configuration();
Configuration 类为用户提供了对当前环境变量的一个实例,其中封装了当前搭载环境的配置,这配置是在我们由 core-site.xml 设置,一般返回值默认的本地系统文件。
而对于 HDFS 为我们提供的 FileSystem,更进一步为我们提供了一套加载当前环境并建立读写路径的 API,使用的方法如下所示:
public static FileSystem get(Configuration conf) throws IOException
public static FileSystem get(URI uri, Configuration conf) throws IOException
第一个方法使用默认的 URI 地址获取当前对象中环境变量加载的文件系统,第二个方法使用传入的 URI 获取路径指定的文件系统。
1.5 FSDataInputStream
我们在对 FSDataInputStream 进行分析之前,将上面例子中代码替换为如下所示:
InputStream fis = fs.open(inPath);
程序依旧可以正常运行。
xxxxxxxxxxpublic class FSDataInputStream extends DataInputStream implements Seekable, PositionedReadable { publicsynchronizedvoid seek(longdesired) throws IOException { ((Seekable) in).seek(desired); } publicint read(longposition, byte[] buffer, intoffset, intlength) throws IOException { return ((PositionedReadable) in).read(position, buffer, offset, length); } publicvoid readFully(longposition, byte[] buffer, intoffset, intlength) throws IOException{ ((PositionedReadable) in).readFully(position, buffer, offset, length); } publicvoid readFully(longposition, byte[] buffer) throws IOException { ((PositionedReadable) in).readFully(position, buffer, 0, buffer.length); }}- 其实read(byte[] b)方法和readFully(byte []b)都是利用InputStream中read()方法,每次读取的也是一个字节,只是读取字节数组的方式不同,查询jdk中源代码发现。
- read(byte[] b)方法实质是读取流上的字节直到流上没有字节为止,如果当声明的字节数组长度大于流上的数据长度时就提前返回,而readFully(byte[] b)方法是读取流上指定长度的字节数组,也就是说如果声明了长度为len的字节数组,readFully(byte[] b)方法只有读取len长度个字节的时候才返回,否则阻塞等待,如果超时,则会抛出异常 EOFException。
xxxxxxxxxxpublicclass FSDSample { publicstaticvoid main(String[] args) throws Exception { Configuration conf = new Configuration(); // 获取环境变量 FileSystem fs = FileSystem.get(conf); // 获取文件系统 FSDataInputStream fsin = fs.open(new Path("sample.txt")); // 建立输入流 byte[] buff = newbyte[128]; // 建立辅助字节数组 intlength = 0; while ((length = fsin.read(buff, 0, 128)) != -1) { // 将数据读入缓存数组 System.out.println(new String(buff, 0, length)); // 打印数据 } System.out.println("length = " + fsin.getPos()); // 打印输入流的长度 fsin.seek(0); // 返回开始处 while ((length = fsin.read(buff, 0, 128)) != -1) { // 将数据读入缓存数组 System.out.println(new String(buff, 0, length)); // 打印数据 } fsin.seek(0); // 返回开始处 byte[] buff2 = newbyte[128]; // 建立辅助字节数组 fsin.read(buff2, 0, 128); System.out.println("buff2 =" + new String(buff2)); System.out.println(buff2.length); }}上述代码是重复读取指定 HDFS 中文件的内容,第一次读取结束后,调用 seek(0)方法从而返回文件开始处重新进行数据读取。
1.6 FSDataOutputStream
xxxxxxxxxxpublic FSDataOutputStream create(Path f) throws IOException { return create(f, true); } public FSDataOutputStream create(Path f, booleanoverwrite) throws IOException { return create(f, overwrite, getConf().getInt("io.file.buffer.size", 4096), getDefaultReplication(), getDefaultBlockSize()); }FSDataOutputStream 也是继承自 OutoutStream 的一个子类,专用为 FileSystem 提供文件的输出流。然后可以使用 OutoutStream 中的 write 方法对字节数组进行写操作。
xxxxxxxxxxpublic class FSWriteSample { public static void main(String[] args) throws Exception { Path path = new Path("writeSample.txt"); // 创建写路径 Configuration conf = new Configuration(); // 获取环境变量 FileSystem fs = FileSystem.get(conf); // 获取文件系统 FSDataOutputStream fsout = fs.create(path); // 创建输出流 byte[] buff = "hello world".getBytes(); // 设置输出字节数组 fsout.write(buff); // 开始写出数组 IOUtils.closeStream(fsout); // 关闭写出流 }}public FSDataOutputStream create(Path f, Progressable progress) throws IOException {}有一个是Progressable progress 的形参, Progressable 接口如下所示:
xxxxxxxxxxpublicinterface Progressable { public void progress(); // 调用 progress 方法}Progressable 接口中只有一个 progress 方法,每次在 64K 的文件写入既定的输入流以后,调用一次 progress 方法,这给我们提供了很好一次机会,可以将输出进度显示,代码如下:
xxxxxxxxxxpublic class FSWriteSample2 { static int index = 0; public static void main(String[] args) throws Exception { StringBuffer sb = new StringBuffer(); // 创建辅助可变字符串 Random rand = new Random(); for (inti = 0; i< 9999999; i++) { // 随机写入字符 sb.append((char) rand.nextInt(100)); } byte[] buff = sb.toString().getBytes(); // 生成字符数组 Path path = new Path("writeSample.txt"); // 创建路径 Configuration conf = new Configuration(); // 获取环境变量 FileSystem fs = FileSystem.get(conf); // 获取文件系统 FSDataOutputStream fsout = fs.create(path, new Progressable() { // 创建写出流 publicvoid progress() { // 默认的实用方法 System.out.println(++index); // 打印出序列号 } }); fsout.write(buff); // 开始写出操作 IOUtils.closeStream(fsout); // 关闭写出流 }}注意: FSDataOutputStream 与 FSDataInputStream 类似,也有 getPos 方法,返回是文件内以读取的长度。但是不同之处在于, FSDataOutputStream 不能够使用 seek 方法对文件重新定位。
第二节:NameNode详解
2.1 NameNode的功能
- 负责客户端请求的响应
- 元数据的管理(查询,修改)
2.2 NameNode 启动过程
NameNode启动的时候首先将fsimage(镜像)载入内存,并执行(replay)编辑日志editlog的的各项操作
一旦在内存中建立文件系统元数据映射,则创建一个新的fsimage文件(这个过程不需SecondaryNameNode) 和一个空的editlog
在安全模式下,各个datanode会向namenode发送块列表的最新情况
此刻namenode运行在安全模式。即NameNode的文件系统对于客户端来说是只读的。(显示目录,显示文件内容等。写、删除、重命名都会失败)
NameNode开始监听RPC和HTTP请求
解释RPC:RPC(Remote Procedure Call Protocol)——远程过程通过协议,它是一种通过网络从远程计算机程序上请求服务,而不需要了解底层网络技术的协议
系统中数据块的位置并不是由namenode维护的,而是以块列表形式存储在datanode中
在系统的正常操作期间,namenode会在内存中保留所有块信息的映射信息
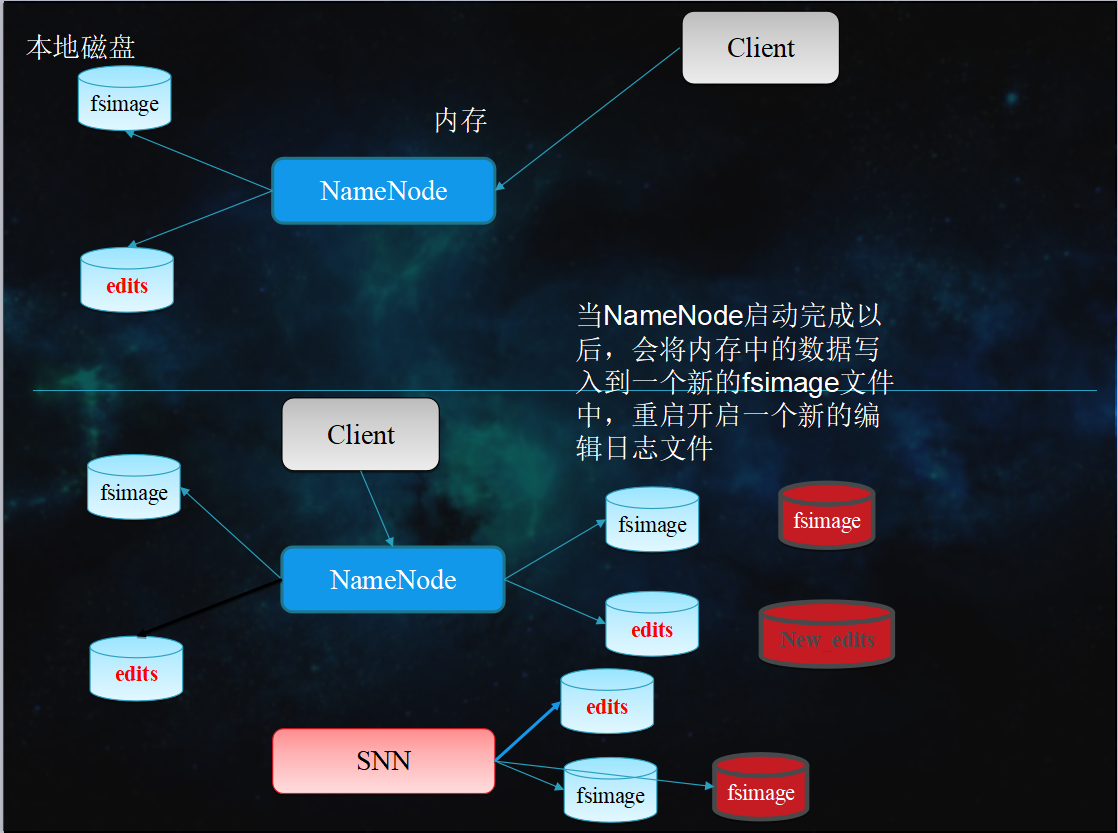
2.3 NameNode元数据管理
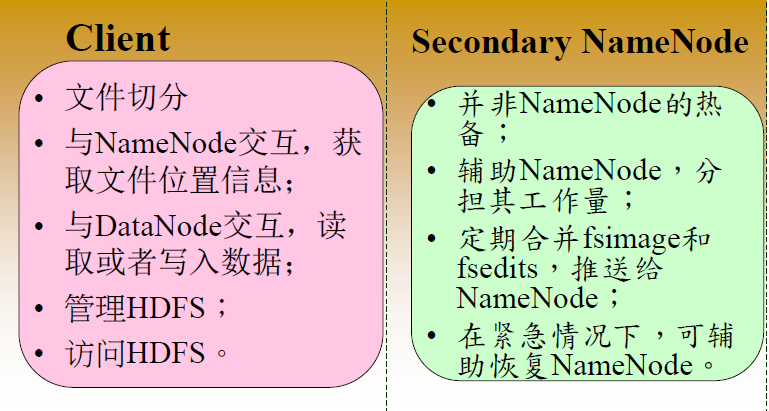
NameNode两个重要文件
- fsimage:元数据镜像文件(保存文件系统的目录树)
- edits:元数据操作日志(针对目录树的修改操作)
元数据镜像
- 内存中保存一份最新的
- 内存中镜像=fsimage+edis
定期合并fsimage与edits
- Edits文件过大将导致NameNode重启速度慢
- Secondary Namenode负责定期合并他们
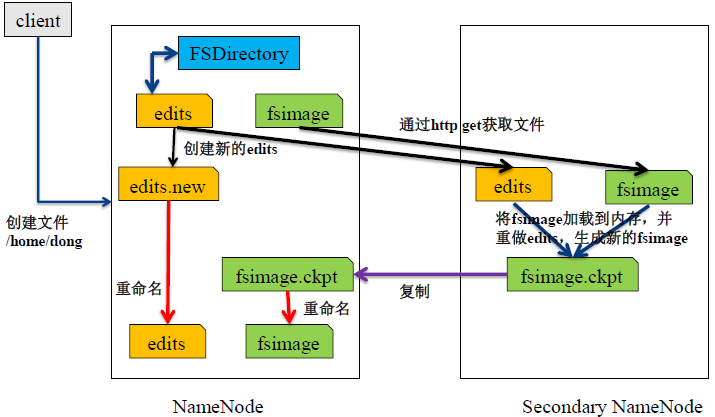
- Secondary NN通知NameNode切换editlog。
- Secondary NN从NameNode 获得fsimage和editlog(通过http方式)。
- Secondary NN将fsimage载入内存,然后开始合并editlog。
- Secondary NN 将新的fsimage发回给NameNode NameNode 用新的fsimage替换旧的fsimage
2.4 安全模式
安全模式下,集群属于只读状态。但是严格来说,只是保证HDFS元数据信息的访问,而不保证文件的访问,因为文件的组成Block信息此时NameNode还不一定已经知道了。所以只有NameNode已了解了Block信息的文件才能独到。而安全模式下任何对HDFS有更新的操作都会失败。
对于全新创建的HDFS集群,NameNode启动后不会进入安全模式,因为没有Block信息。
安全模式相关命令
查询当前是否安全模式
xxxxxxxxxxhadoop dfsadmin -safemode getSafe mode is ON等待safemode关闭,以便后续操作
xxxxxxxxxxhadoop dfsadmin -safemode wait退出安全模式
xxxxxxxxxxhadoop dfsadmin -safemode leave设置启用safemode
xxxxxxxxxxhadoop dfsadmin -safemode enter
第三节 DataNode详解
3.1 Datanode功能
存储管理用户的文件块数据定期向namenode汇报自身所持有的block信息(通过心跳信息上报汇报的目的是,namenode如果长时间接收不到一个datanode的心跳后,说明该datanode宕机了,该datanode的数据块就被namdenode拿不到了,需要从其他机上拿该datanode的数据块副本。
3.2 Datanode掉线判断时限参数
datanode进程死亡或者网络故障造成datanode无法与namenode通信,namenode不会立即把该节点判定为死亡,要经过一段时间,这段时间暂称作超时时长。HDFS默认的超时时长为10分钟+30秒。如果定义超时时间为timeout,则超时时长的计算公式为:
timeout = 2 * heartbeat.recheck.interval + 10 * dfs.heartbeat.interval。
而默认的heartbeat.recheck.interval 大小为5分钟,dfs.heartbeat.interval默认为3秒。
需要注意的是hdfs-site.xml 配置文件中的heartbeat.recheck.interval的单位为毫秒,dfs.heartbeat.interval的单位为秒。所以,举个例子,如果heartbeat.recheck.interval设置为5000(毫秒),dfs.heartbeat.interval设置为3(秒,默认),则总的超时时间为40秒。